
Collect part or all of an order later using the Balance payment method. You can take a deposit in the Box Office, offer online deposits for general admission tickets, collect the remaining balance, and manage changes to the order.
Balance due orders appear in Box Office → Order Management → Group Sales. You may also hear these called pending sales or group sales. A group sale does not have to contain multiple tickets.
1. Create a balance due order in the Box Office
Go to Box Office → Box Office → Quick Select (or use your normal Box Office or Phone Sales workflow). Select the event and date, add the tickets, and confirm your selection.
Add or select the customer. Include a valid email address if you plan to send an online payment request.
Review the cart and delivery method, then click Pay Now to open Payment Methods.
Choose the payment method for the amount collected now and change that payment amount to the deposit. A second payment line appears for the difference.
Choose Balance on the remaining payment line. Set the Due Date and review the amount marked “This amount is to be collected later!”
Confirm that the payment lines equal the order total, then click Process Order.
Example: For a $500 order, record $100 as Cash and $400 as Balance. The customer owes the $400 later. When taking cash, also enter the amount actually received so the change due is correct.
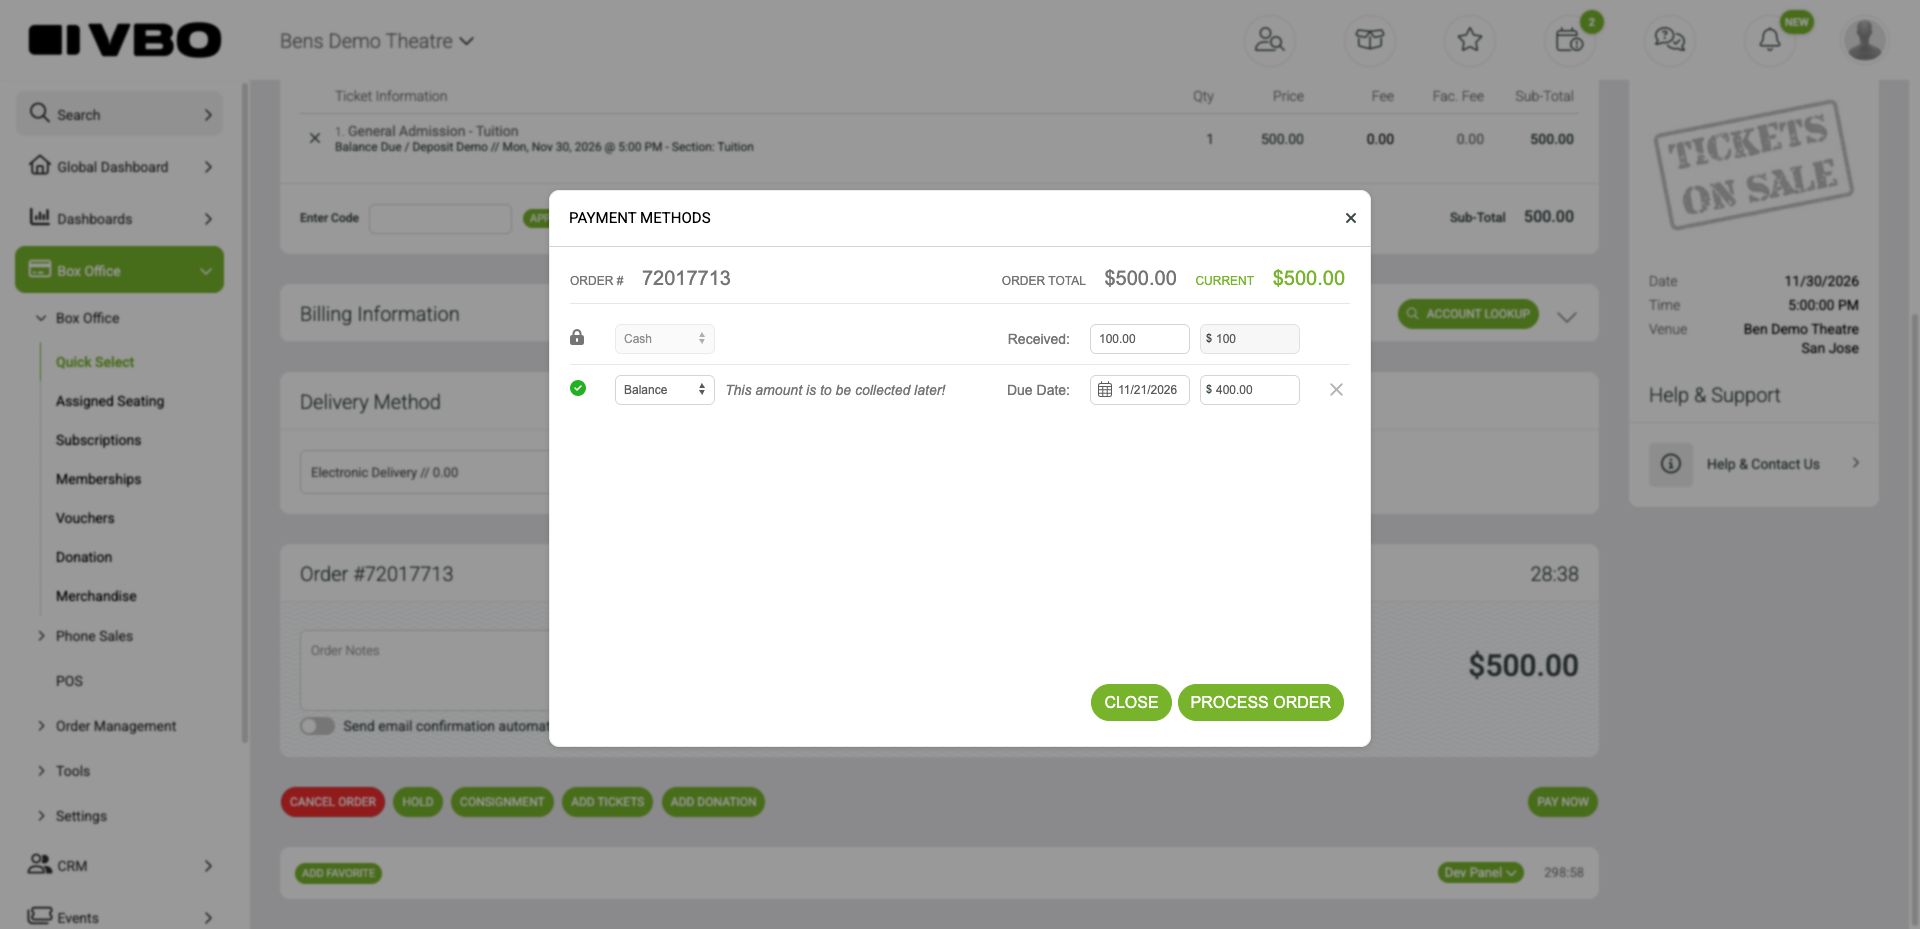
Payment Methods: $100 collected now and $400 left on Balance
No deposit: To collect nothing at the time of booking, select Balance for the full order amount. A Box Office balance order does not require online deposit settings on the event.
2. Find an order and update its information
Open Box Office → Order Management → Group Sales.
Use the event, event date, order number, customer information, due-date filters, and Options to locate the order. Click Submit after changing filters.
Check the order total, outstanding balance, and due-date countdown. Open the gear menu to manage the order.
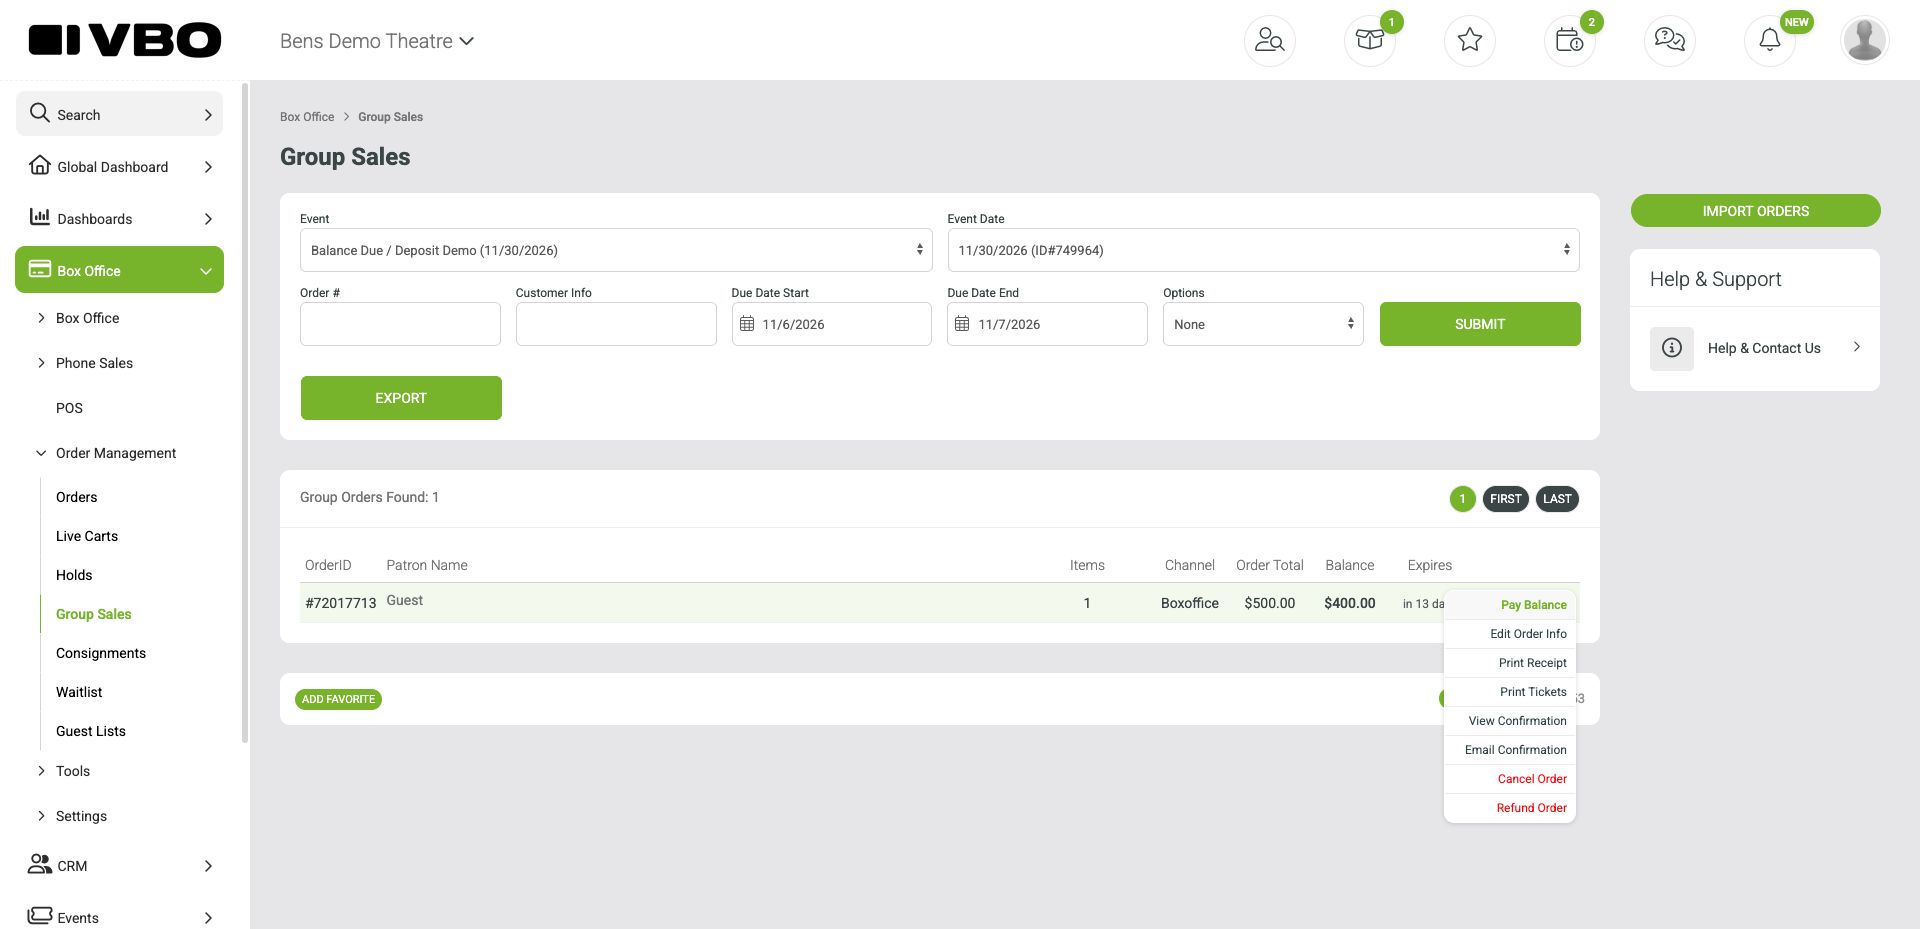
Group Sales shows the outstanding balance and available order actions
Use Open Balance to focus on unpaid orders and Fully Paid to find settled orders. You can also find the order under Orders and click its Balance of link.
Edit Order Info lets you update order information such as the balance due date. To change the tickets, use the exchange workflow below.
Important: An Expired label means the balance due date has passed. It does not automatically cancel the order or release its tickets. Review overdue orders and take the appropriate action.
3. Collect the remaining balance
Collect payment in the Box Office
In Group Sales, open the gear menu and select Pay Balance.
Select Box Office and click Pay Now.
In Payment Methods, choose the tender used to pay the remaining amount and process the payment.
Review the updated balance and receipt.
Email an online payment request
Open Pay Balance and select Online.
Verify the customer's Email Address.
Choose Full Payment Required or Partial Amount Allowed.
If appropriate, enable Offer Early Pay Discount and enter the offer's amount and deadline.
Choose the Default email message or Message Option #1, #2, or #3. Review and edit the message.
Click Email Pay Request. The customer receives a link to pay the balance online.
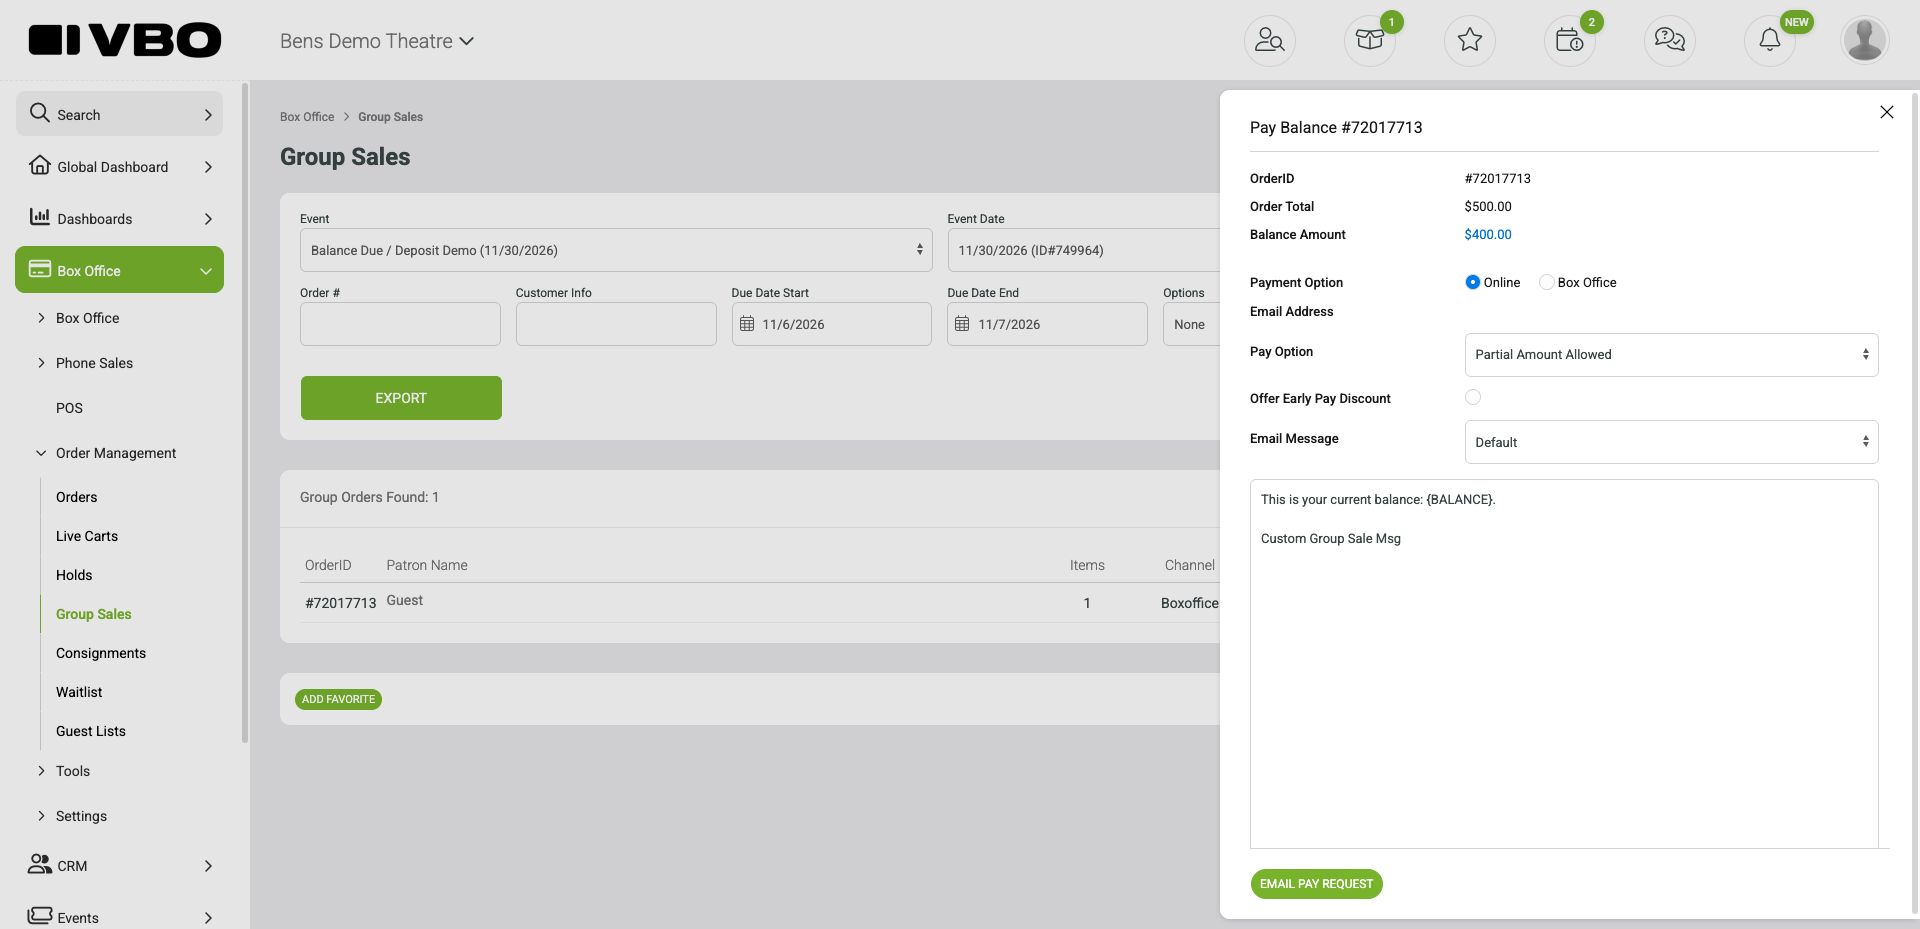
Pay Balance: choose Online to prepare a payment request
The customer uses the payment link to pay the full balance or an allowed partial amount. After a partial payment, the remaining balance is still due. Review the current order balance before sending another request.
Set reusable payment messages
Open Box Office → Settings → Box Office Settings. Configure Custom Group Sale Msg Default and the alternate Custom Group Sale Msg 1, 2, and 3, then save. Use the placeholders displayed next to each field, such as {FIRSTNAME}, {LASTNAME}, {COMPANY}, {BALANCE}, and {DUEDATE}. The default message also supports {BalanceLink}.
Write clear instructions explaining how and when the customer should pay. Do not promise an automatic card charge unless your organization has separately confirmed that arrangement.
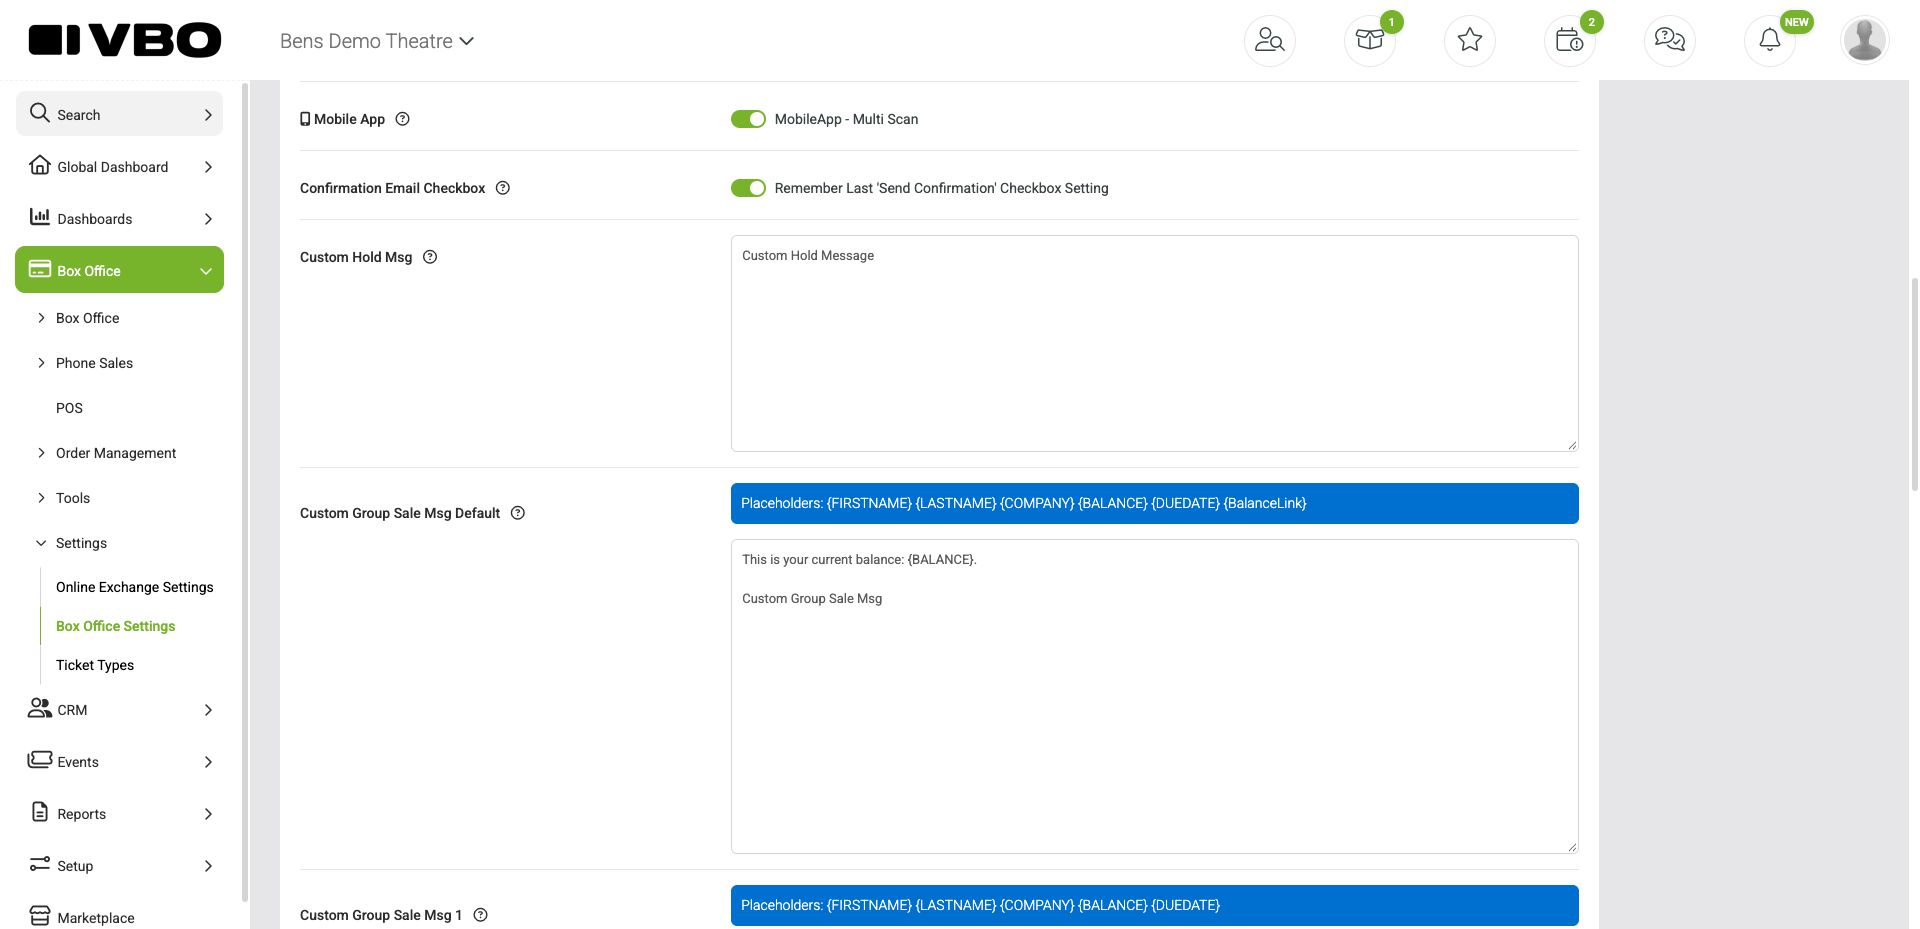
Box Office Settings: default group sale message and supported placeholders
4. Adjust tickets through an exchange
Use an exchange when you need to replace tickets, move the booking, or change the ticket selection. Review the replacement ticket prices, quantities, and any exchange fee before processing.
Go to Box Office → Order Management → Orders and search for the original order.
Click the order number to expand the ticket list.
Turn on Exchange for each ticket being changed. Enter an exchange fee if applicable, and select Box Office or Phone Sales.
Click Exchange. The selected original tickets appear as Pending Refunds while you choose the replacement tickets.
Select the replacement event/date and tickets. In Quick Select, click the displayed price to enter a different selling price before selecting the quantity, if needed. Leave Straight Exchange off when the replacement price should change the order total. Confirm the selection and review the original ticket credit, replacement ticket total, and difference.
Complete the exchange using the appropriate payment or refund workflow. If money is being collected, review Payment Methods before processing.
Return to the original order and check the updated tickets, total, payments, and remaining balance. Send the customer the updated confirmation or payment request as needed.
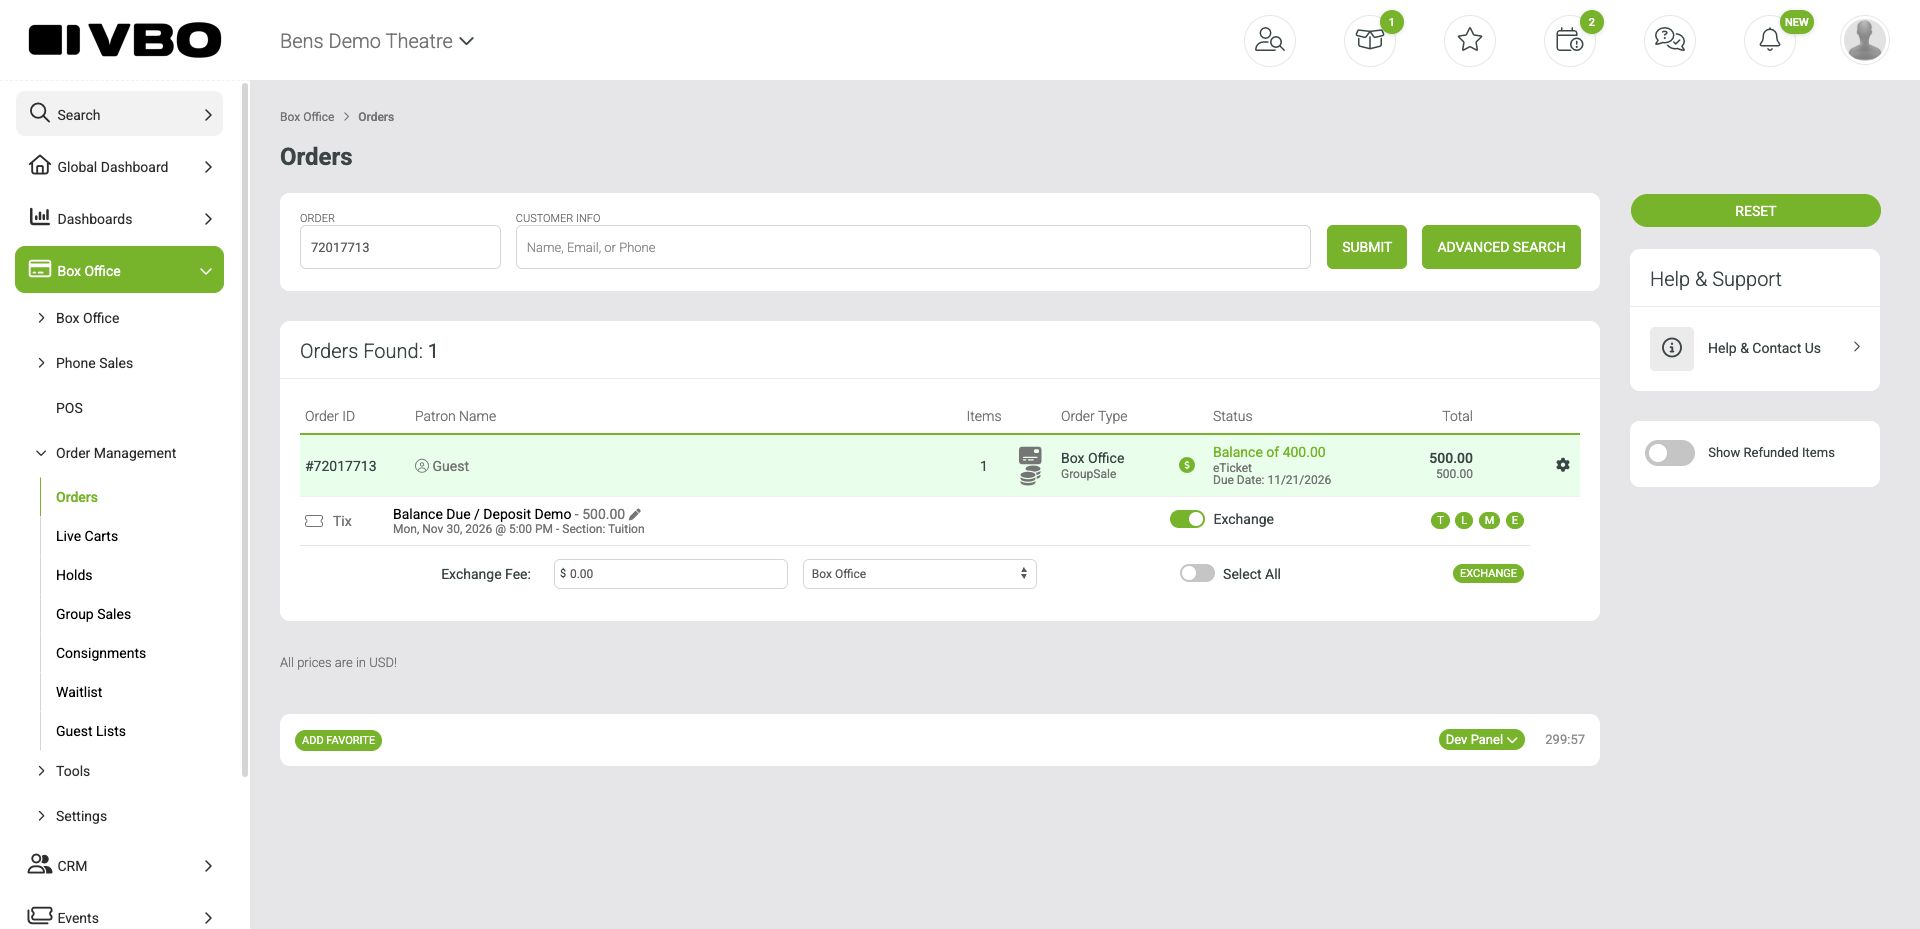
Orders: select tickets for exchange and choose the sales channel
Collect a price increase now
Example: A $500 order had $100 paid and $400 due. Exchanging its one ticket for two $500 tickets and collecting the $500 difference as cash changed the order total to $1,000. The original $400 balance and due date remained. The exchange difference and the existing balance are separate amounts to review.
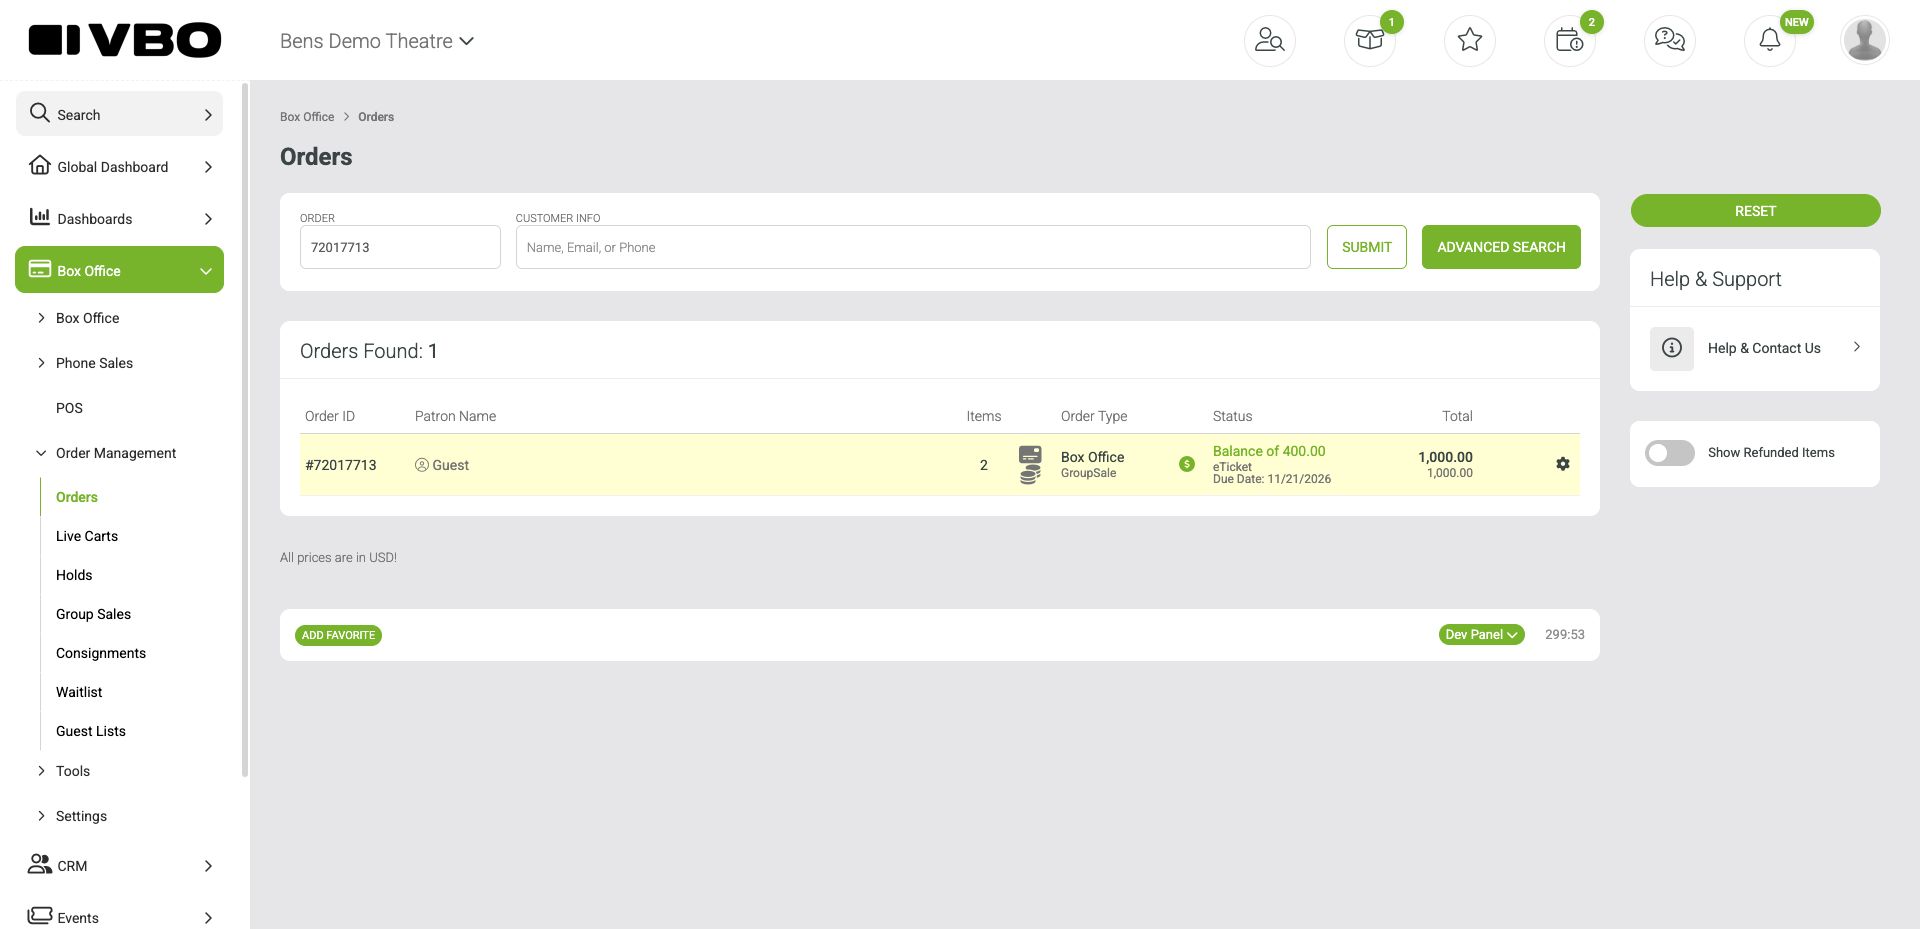
After the exchange: two tickets, a $1,000 total, and the original $400 still due
Reduce the price and lower the balance due
Start the exchange, select the replacement ticket at the lower price, and confirm it. The cart shows the difference as a negative amount.
Click Refund Now, review the exchange summary, and click Continue.
Turn on Current Balance, labeled Adjust balance due. Review the credit amount applied to the unpaid balance. Leave cash or other payment refunds off when the difference should only reduce what the customer owes.
Enter a reason and click Refund to complete the adjustment.
Return to Orders and verify the new ticket prices, order total, and balance due.
Example: An order totaled $1,000, with $600 already paid and $400 due. Replacing one $500 ticket with a $300 ticket created a $200 credit. Applying that credit to Current Balance reduced the order total to $800 and the amount due to $200. The $600 already paid remained on the order; no cash was returned.
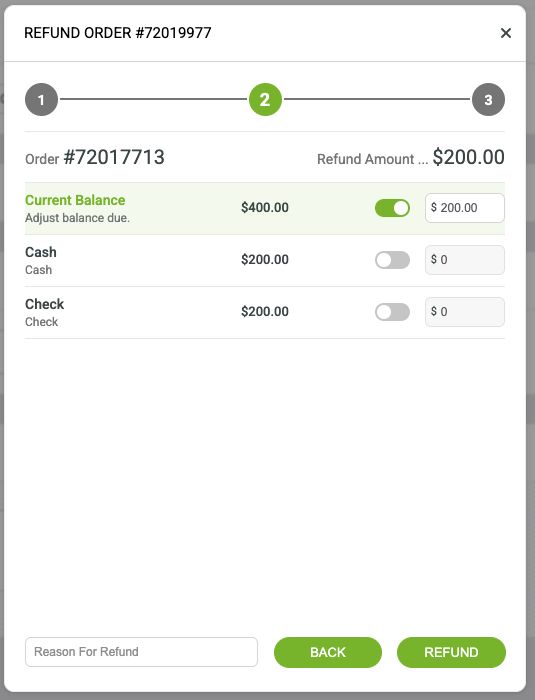
Select Current Balance to apply the $200 credit against the $400 unpaid balance.
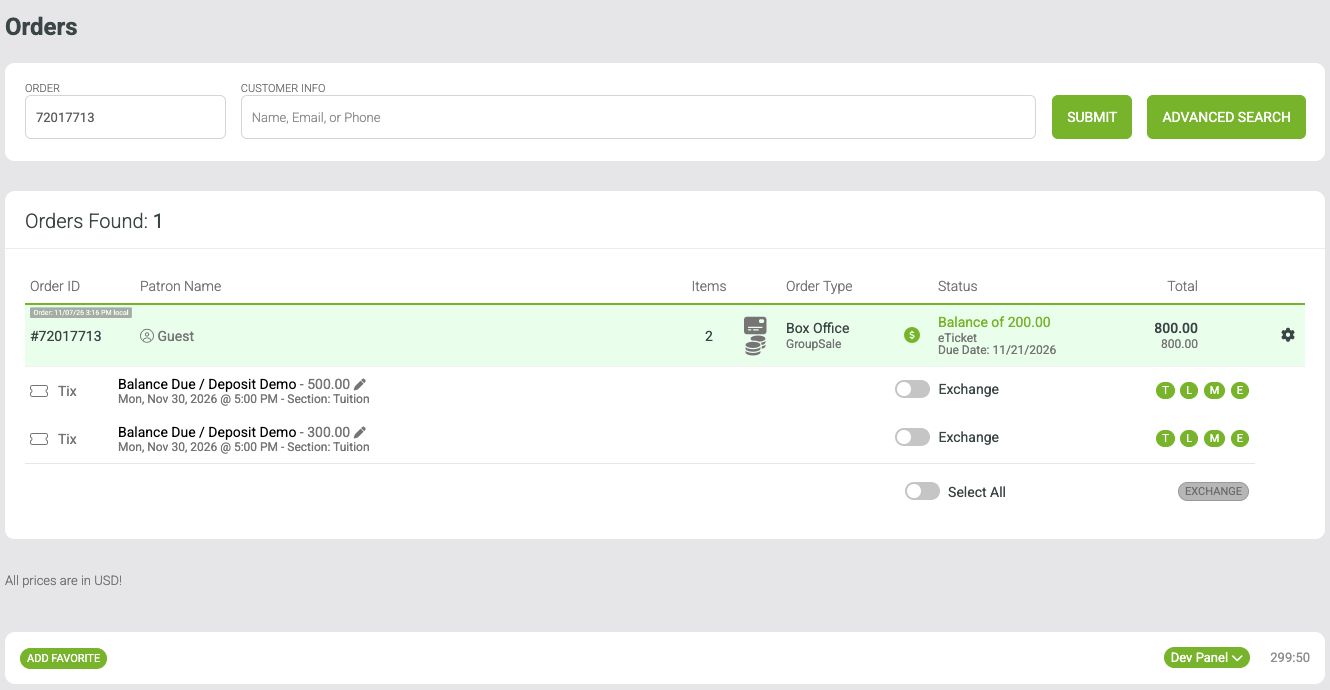
After the reduction: $800 order total and $200 balance due.
Increase the price and collect the difference later
Start the exchange and confirm the replacement tickets at the higher price.
Click Pay Now. In Payment Methods, select Balance for the exchange difference if it will be collected later. Review the amount and due date, then click Process Order.
If the customer pays the difference now, select the payment method actually used instead.
Return to the original order and check the updated total and outstanding balance.
Example: After the price reduction above, the order totaled $800, with $600 paid and $200 due. Exchanging the $300 ticket for a $400 ticket and putting the $100 difference on Balance raised the total to $900 and the amount due to $300. The $600 already paid remained unchanged.
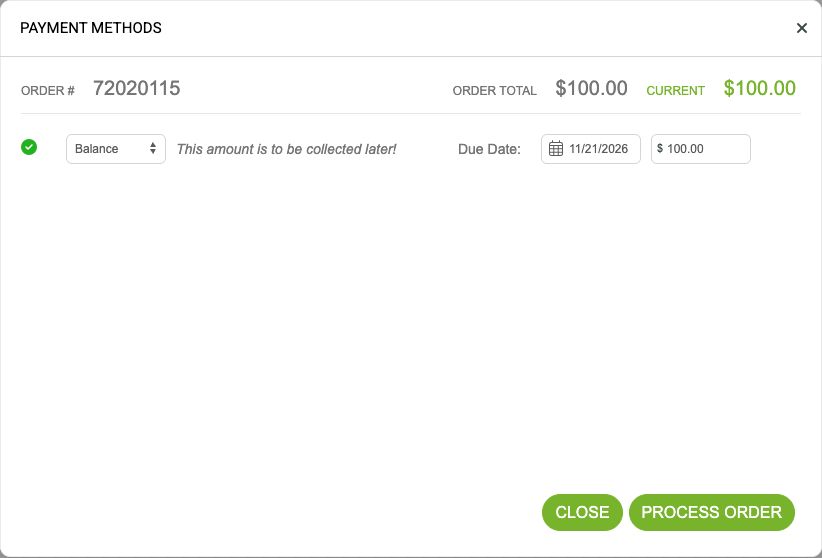
Select Balance for a $100 price increase that will be collected later.
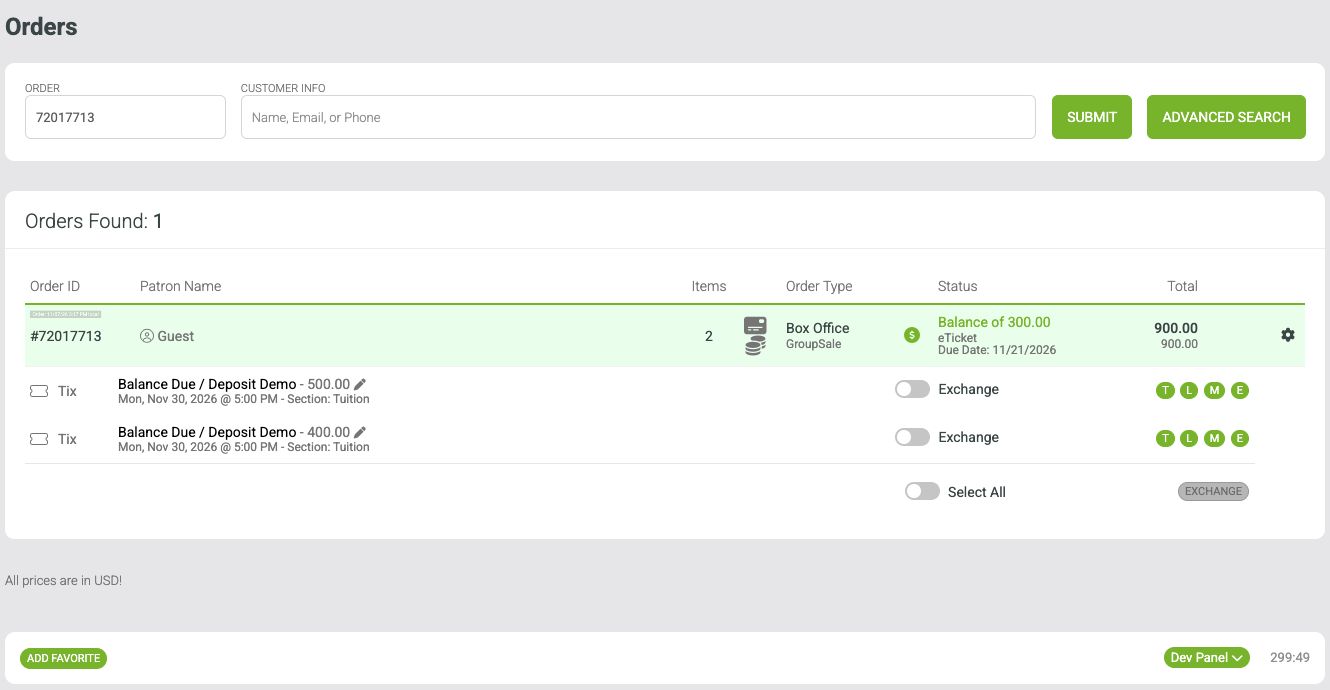
After the increase: $900 order total and $300 balance due.
Review before processing: A lower-price exchange can reduce the unpaid balance when you apply its credit to Current Balance. A higher-price exchange can be paid now or added to Balance. If a reduction exceeds the remaining balance, review the remaining credit and available refund methods before completing the transaction.
5. Cancel or refund a balance due order
Find the order in Group Sales and open its gear menu. Choose the action based on whether the organization will keep or return money already collected.
Action | When to use it | Result |
|---|---|---|
Cancel Order → Cancel Balance Due | Cancel the booking and retain the money already collected. | The outstanding balance is cleared and the paid amount becomes a cancellation fee. |
Cancel Order → Cancel + Donate | Cancel the booking and convert the paid amount into a donation, when appropriate. | The cancellation dialog offers the donation option separately from the cancellation fee. |
Refund Order | Return the collected payment and clear the unpaid balance. | Review the items and refund amounts in the refund workflow before processing. |
No payment collected | Remove a completely unpaid order. | Use Refund Order to zero out the unpaid order. There is no collected payment to return. |
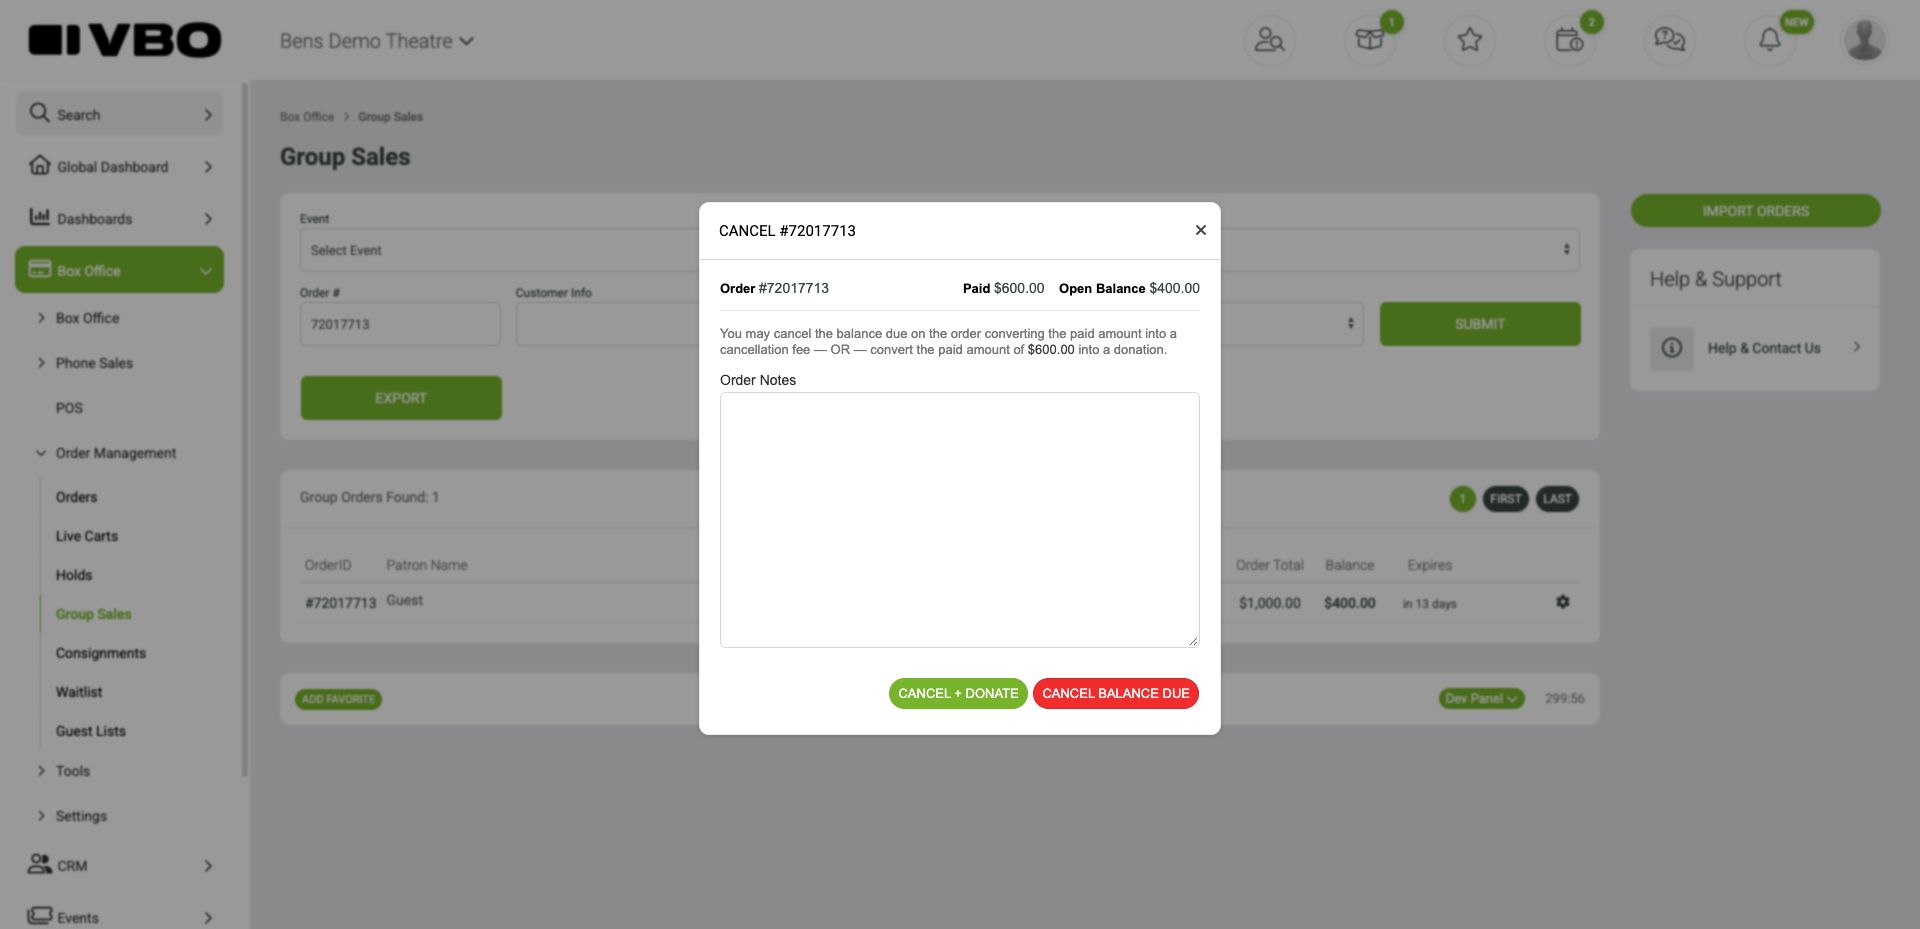
Cancel dialog distinguishes paid money from the open balance
Canceling does not return the deposit. Use Refund Order when the collected amount should be returned. Available actions depend on user permissions and the order; Event Protection may prevent cancellation through Cancel Balance Due.
6. Offer online deposits for general admission tickets
Online deposits are useful for classes and other general admission events. You can configure deposit options in a pricing template before creating an event, or configure them on the event's tickets.
Open the event and select Active Event → Tickets + Pricing → Manage Tickets.
Select the event date, click the general admission ticket name, and click More Options.
Scroll to Deposit Options and choose via Group Sale.
Review the Full ticket price and enter the fixed Deposit amount per ticket.
Set Enforce Deposit to No to let customers choose full payment or a deposit. Set it to Yes to require the deposit option at initial checkout.
Click Save+Close. Preview the event online and confirm the prices and deposit choices.
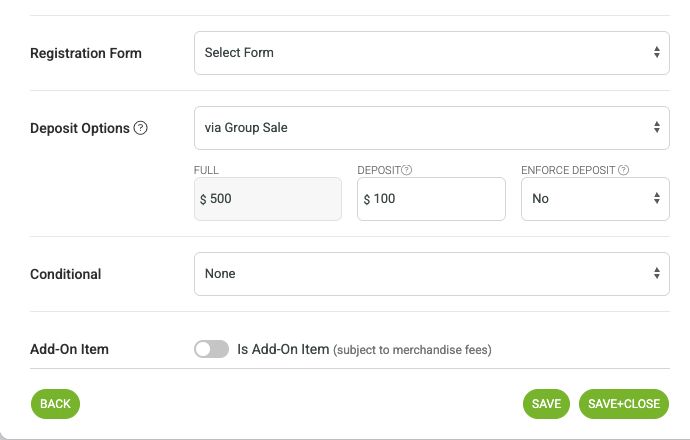
More Options: $500 full price, $100 deposit, and Enforce Deposit set to No
When deposits are optional, the customer can select Pay in Full or Pay Deposit. The deposit applies to each ticket; review the cart for the amount charged now, applicable fees, and the remaining balance.
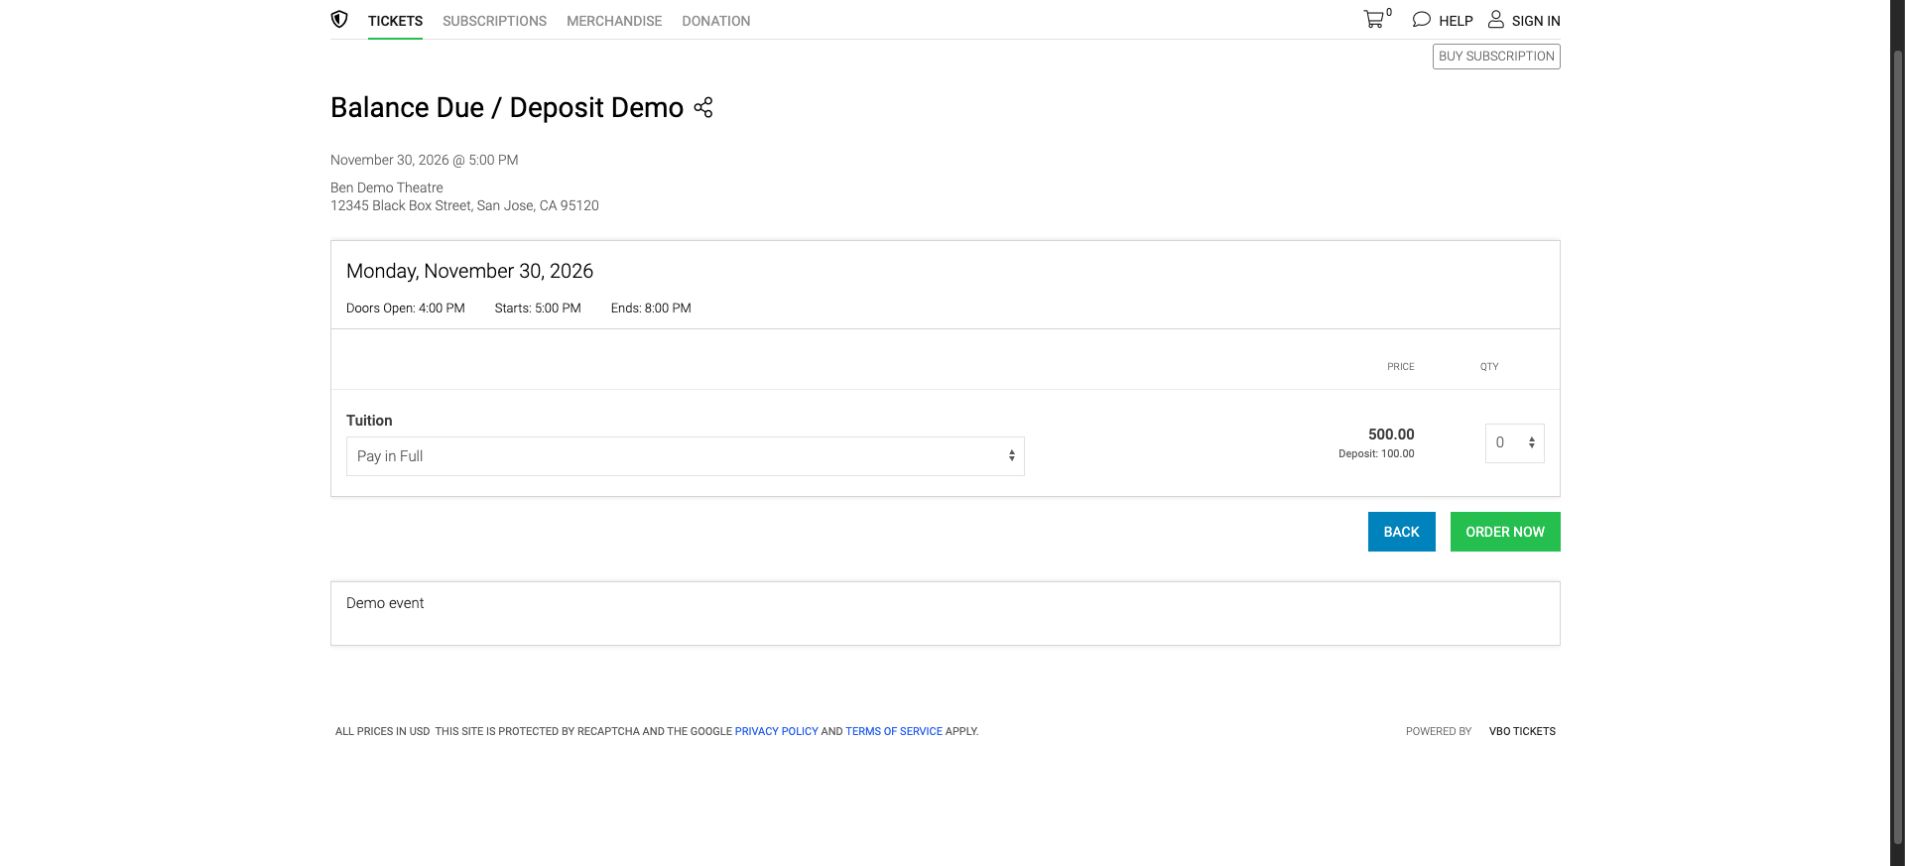
Online ticket selection offers full payment or a deposit
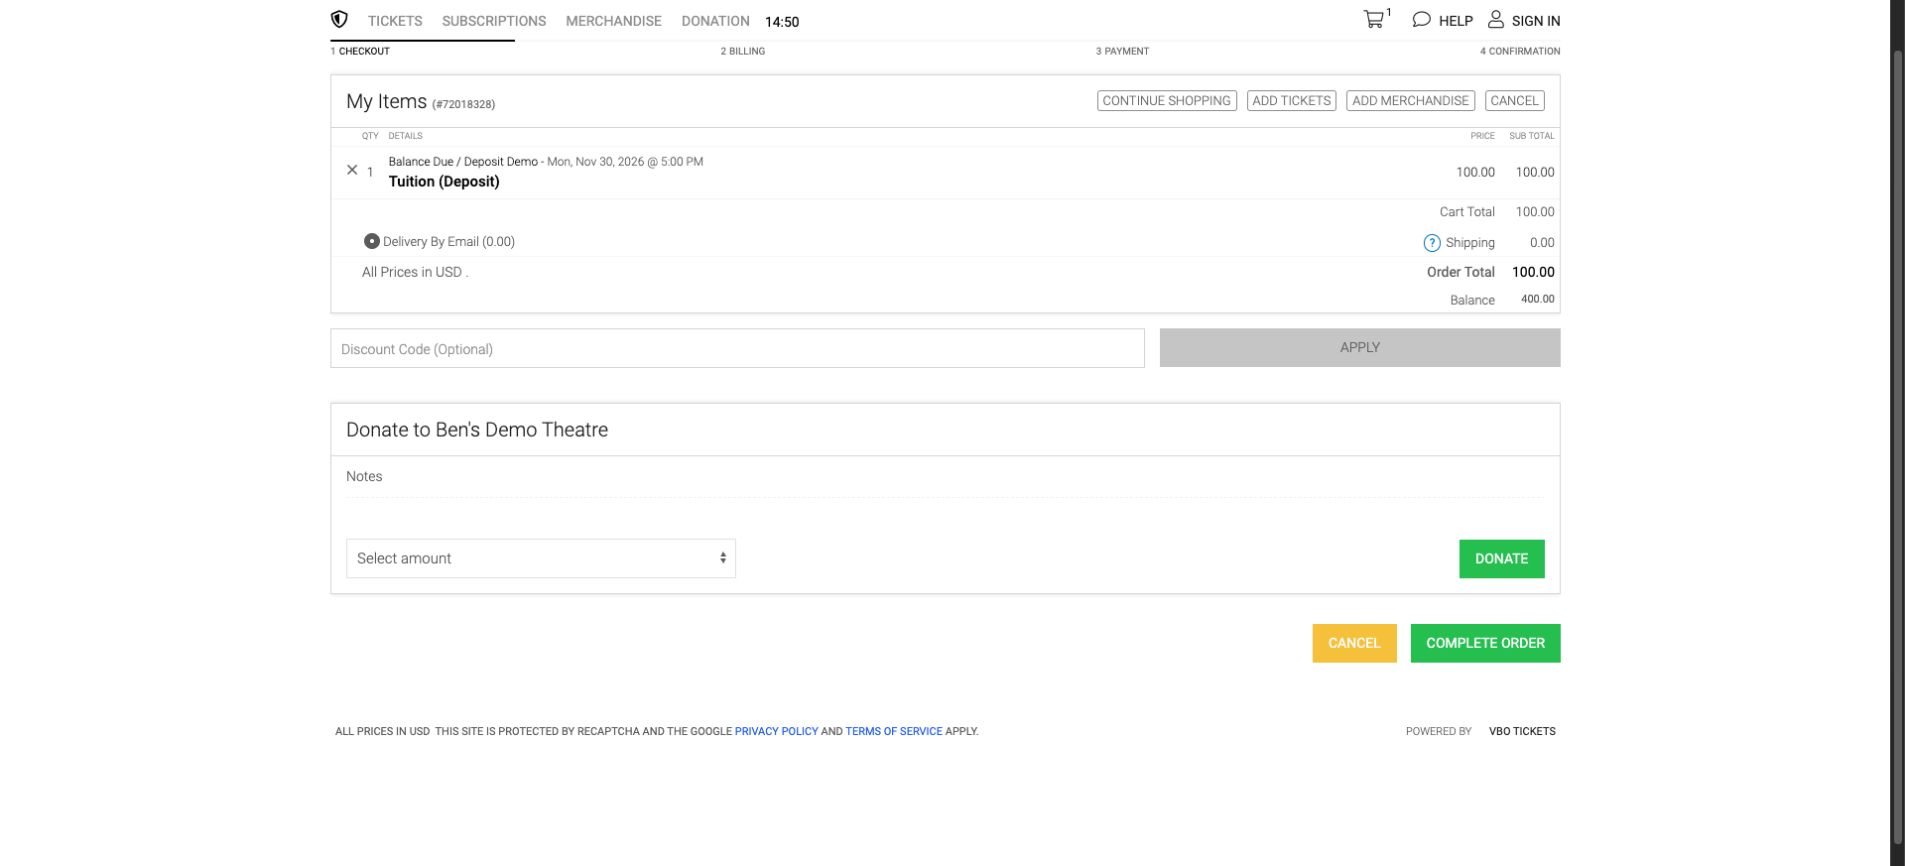
Deposit cart: $100 payable now and a separate $400 balance
Online due date: The balance from an online deposit is due 14 days before the event. For an order containing multiple deposit event dates, the earliest date determines this deadline. Box Office orders use the due date entered by staff. The customer pays the remainder through a balance payment link.
7. Send an overdue payment warning
Go to CRM → Communications → Mail Templates and add a template.
Choose Payment Warning 1, Payment Warning 2, or Payment Warning 3. Enter the template name and warning content, then save it.
Find the overdue order under Orders. Open its gear menu and choose Send Warning.
Select the Warning Template, review the Warning Content, and choose the email or print action displayed in the composer.
Warnings are sent manually. To send an online payment link, use Pay Balance → Online → Email Pay Request. Review the recipient and message before sending.
8. Monitor and report on balance due orders
Use Box Office → Order Management → Group Sales as the working list for balances.
Select an event and event date, or search for an order or customer.
Set Options → Open Balance to find amounts still owed. Use Fully Paid when reviewing settled orders.
Use Due Date Start and Due Date End to review balances due during a specific period. Click Submit.
Review Order Total, Balance, and Expires. A red Expired status indicates that the payment deadline has passed.
Click Export to download the matching group sales records for follow-up or reconciliation. The export includes balance, due date, and payment status.
You can also use Orders → Advanced Search and the Open Balance option to find unpaid orders. Click the order’s Balance of link to manage payment. The Cashier Report includes Balance as a payment type; an amount assigned to Balance is money still to be collected.
9. Guest lists, POS, and entry
The original order reserves the sold inventory and creates its tickets even while a balance is outstanding. Staff can access confirmations and print tickets. An outstanding balance can block admission when tickets are scanned, so collect the balance before entry and review the order if a Balance Due warning appears.
Event Manager guest list
Go to Box Office → Order Management → Guest Lists.
Select the event and date, then search by the customer name or order ID and click Find.
Unpaid tickets show a red Balance Due warning with the amount owed.
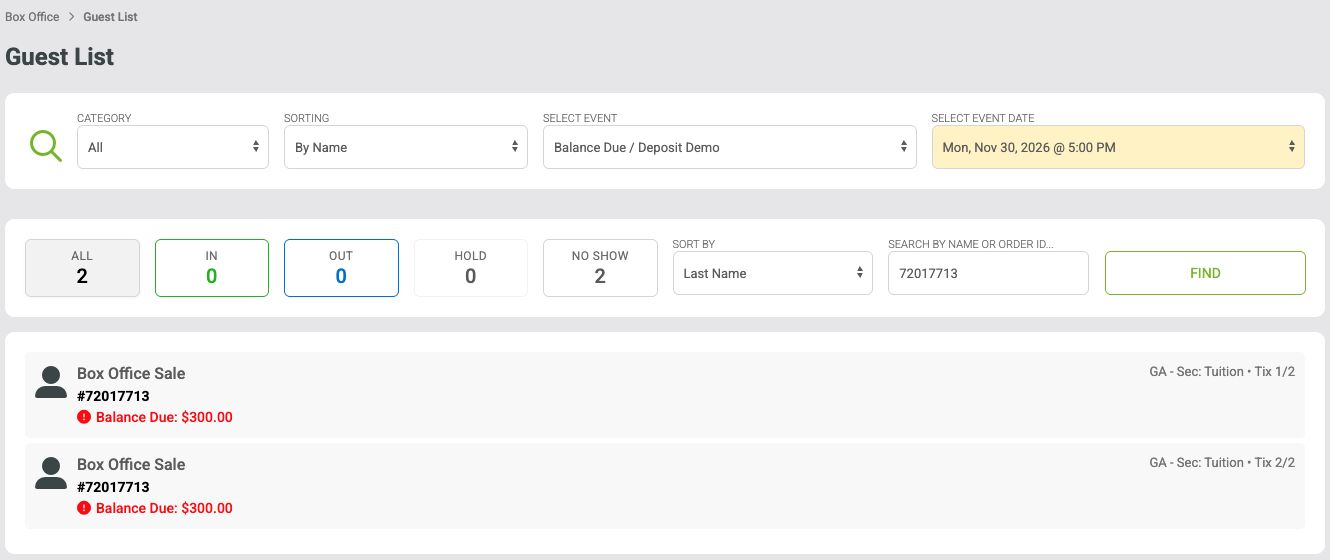
Event Manager guest list: red balance-due warnings on each ticket
The balance is for the order. The same amount appears on each ticket from that order. In this example, both ticket rows show $300, but the customer owes $300 in total—not $300 for each ticket.
POS guest list and order lookup
In POS, select the event/date and open Guest List. You can search by name or order ID. Tickets belonging to the unpaid order show the same red Balance Due: $300.00 warning. The demo guest list offers a print-ticket button beside each entry.
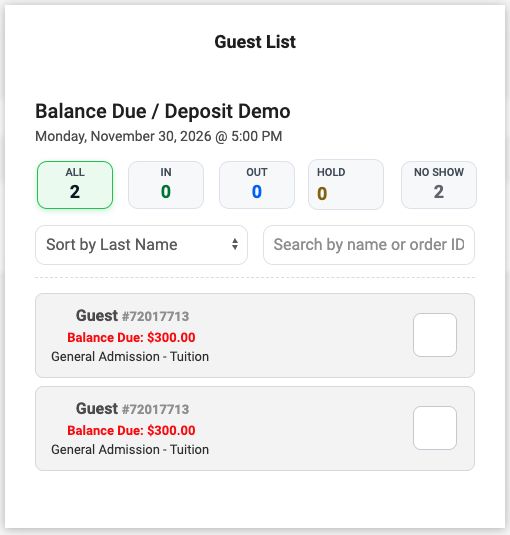
POS guest list: the order balance appears in red under each ticket
POS Orders shows the order number, customer, status, and order total. In the example below, the card shows New Order and $900.00, while the guest list confirms that $300 remains due. The displayed order total is not proof of full payment.
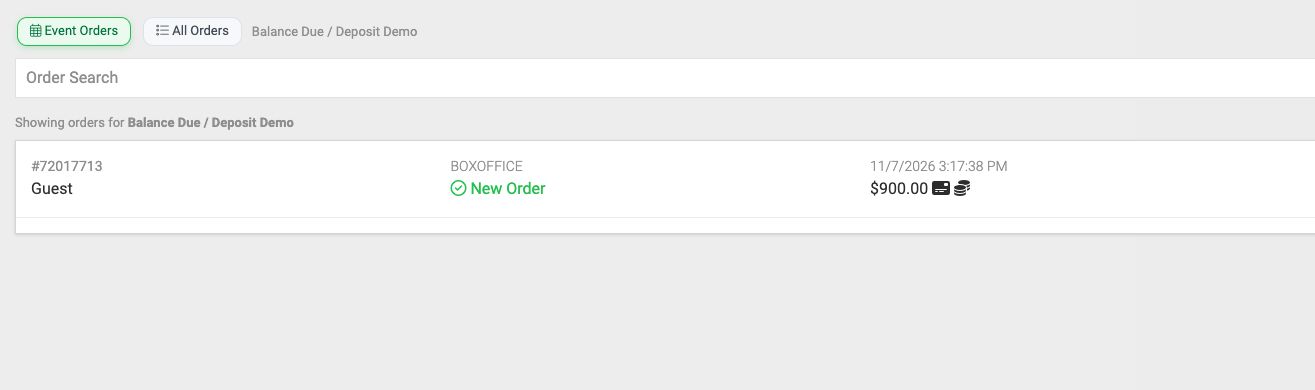
POS Orders: order total shown on the order card
To collect the outstanding amount, open Event Manager → Box Office → Order Management → Group Sales → Pay Balance. Review the balance before admitting the customer.
Keep track of overdue orders in Group Sales. Passing the due date does not automatically charge a card or cancel the booking.